Introduction to Suryanamaskar
Suryanamaskar, also known as Sun Salutation, is one of the most powerful and complete yoga practices. It combines a sequence of 12 postures performed in a flow, synchronized with specific breathing patterns. While many yoga asanas target individual body parts, Suryanamaskar offers a full-body workout, harmonizing physical fitness, breath control, and mental focus.
Practiced for centuries, it is considered both a spiritual ritual and a scientific exercise. The word “Surya” means Sun, and “Namaskar” means greeting or salutation. By practicing Suryanamaskar, yogis honor the Sun—the primary source of life and energy on Earth.
Historical and Spiritual Significance of Sun Salutation
The roots of Suryanamaskar lie deep within Indian tradition. Ancient texts describe the Sun as a deity that governs vitality, wisdom, and inner strength. Yogis practiced Suryanamaskar at sunrise to absorb the morning prana (life energy).
Spiritually, each step represents a form of devotion, surrender, and respect. The sequence also stimulates the chakras (energy centers) of the body, especially the Manipura Chakra, which governs confidence, willpower, and vitality.
Over time, Suryanamaskar evolved from being a ritualistic prayer into a holistic health practice recommended by modern yoga schools worldwide.
Why Practice Suryanamaskar Daily?
Practicing Suryanamaskar daily has countless benefits:
Physical Fitness – It tones muscles, enhances flexibility, and improves stamina.
Metabolic Boost – Regular practice increases metabolism, aiding in weight management.
Mental Clarity – The flow of poses reduces stress and sharpens focus.
Detoxification – Deep breathing during each posture enhances oxygen supply and flushes toxins.
Spiritual Balance – It aligns mind, body, and soul.
Even doing 6 to 12 rounds daily can bring visible changes in strength, flexibility, and mood.
Preparing for Suryanamaskar: Warm-Up and Safety Tips
Before you begin, it’s important to prepare properly:
Choose the Right Time – Early morning, facing the rising sun, is ideal.
Empty Stomach – Practice at least 3–4 hours after meals.
Warm-Up – Gentle stretches for the spine, shoulders, and legs prevent injury.
Comfortable Space – Use a yoga mat in a quiet, ventilated area.
Listen to Your Body – Beginners should start slowly, increasing rounds gradually.
If you’re new, aim for 2–3 rounds per day, and slowly build up to 12 or more.
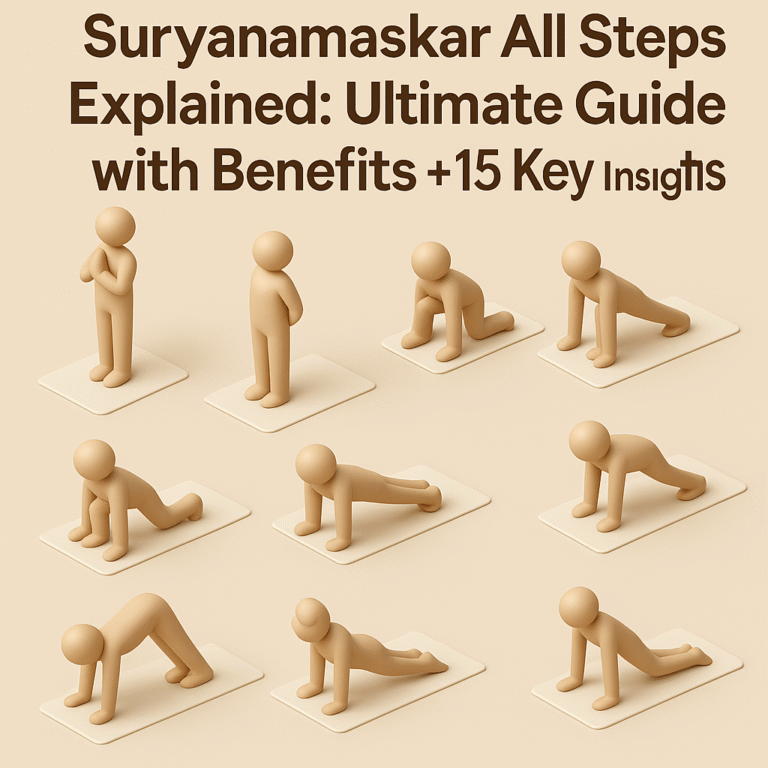
Step-by-Step Breakdown of the 12 Suryanamaskar Poses
Step 1: Pranamasana (Prayer Pose)
Stand straight, feet together.
Join palms in Namaste at chest level.
Breathing: Exhale.
Benefit: Promotes calmness and focus.
Step 2: Hasta Uttanasana (Raised Arms Pose)
Inhale, raise arms overhead.
Stretch back slightly, arching spine.
Benefit: Expands lungs, improves digestion.
Step 3: Padahastasana (Hand to Foot Pose)
Exhale, bend forward, touching palms to the floor beside feet.
Keep knees straight.
Benefit: Enhances flexibility, tones abdomen.
Step 4: Ashwa Sanchalanasana (Equestrian Pose)
Inhale, stretch right leg back, left knee bent.
Lift head upward.
Benefit: Strengthens spine, opens hips.
Step 5: Dandasana (Stick Pose)
Exhale, take left leg back, body straight like a plank.
Benefit: Improves posture, strengthens arms and core.
Step 6: Ashtanga Namaskar (Salute with Eight Parts)
Lower chest and chin to floor, hips raised.
Eight points (hands, chest, chin, knees, toes) touch the ground.
Breathing: Hold.
Benefit: Strengthens arms, chest, and back.
Step 7: Bhujangasana (Cobra Pose)
Inhale, slide forward, raise chest, elbows close to body.
Benefit: Boosts spinal flexibility, tones abdominal organs.
Step 8: Parvatasana (Mountain Pose)
Exhale, raise hips, form inverted “V” with body.
Benefit: Strengthens legs, improves blood circulation.
Step 9: Ashwa Sanchalanasana (Equestrian Pose – Other Leg)
Inhale, bring right leg forward, left leg extended back.
Benefit: Improves balance and stretches lower body.
Step 10: Padahastasana (Hand to Foot Pose)
Exhale, bring left foot forward, bend down.
Benefit: Stimulates digestion, relieves stress.
Step 11: Hasta Uttanasana (Raised Arms Pose)
Inhale, raise arms overhead, arch back slightly.
Benefit: Opens chest, energizes body.
Step 12: Pranamasana (Prayer Pose)
Exhale, return to standing Namaste.
Benefit: Brings mental peace and grounding.
One full round = 12 steps. Traditionally, practitioners perform 12 rounds (6 with each leg leading).
Breathing Pattern During Each Step
Correct breathing is the key to Suryanamaskar:
Inhale: Hasta Uttanasana, Ashwa Sanchalanasana, Bhujangasana.
Exhale: Padahastasana, Parvatasana.
Hold Breath: Ashtanga Namaskar.
Natural Breathing: Pranamasana.
This rhythm balances oxygen flow, energizes the nervous system, and calms the mind.
Physical Benefits of Suryanamaskar
Strengthens muscles and joints.
Improves flexibility of spine and limbs.
Aids digestion and reduces bloating.
Helps in weight management.
Increases lung capacity and stamina.
Improves posture and balance.
Mental and Emotional Benefits
Suryanamaskar is not just physical; it deeply influences mental well-being:
Reduces anxiety and stress.
Enhances concentration and memory.
Promotes emotional balance.
Induces relaxation and better sleep.
Builds self-discipline and resilience.
Variations of Suryanamaskar Across Yoga Traditions
Different schools of yoga have adapted the sequence:
Hatha Yoga – Traditional 12-step sequence.
Ashtanga Yoga – Sun Salutation A & B with vinyasa flow.
Iyengar Yoga – Focus on alignment and props.
Power Yoga – Faster pace for calorie burn.
Each variation has unique benefits but shares the same foundation of energy flow.
Common Mistakes and How to Avoid Them
Rushing Through Steps – Practice mindfully with breath.
Incorrect Alignment – Keep spine straight, avoid over-bending.
Holding Breath Too Long – Follow natural flow.
Skipping Warm-Up – Increases risk of strain.
Beginners should learn under a qualified yoga teacher before attempting advanced rounds.
Who Should Avoid Suryanamaskar? Contraindications Explained
While beneficial, Suryanamaskar isn’t for everyone:
Pregnant women (after first trimester).
People with hernia, back injury, or high blood pressure.
Individuals with heart conditions (unless approved by doctor).
Those with severe arthritis or spinal issues.
Always consult a physician if you have chronic health concerns.
Best Time and Place to Practice
Ideal Time: Early morning at sunrise.
Direction: Face east to absorb sun energy.
Environment: Quiet, ventilated, natural surroundings.
Frequency: Beginners – 3 rounds; Advanced – 12+ rounds.
Integrating Suryanamaskar into Your Yoga Routine
Suryanamaskar can be:
A standalone workout (15–20 minutes).
A warm-up sequence before yoga asanas.
A meditative practice when done slowly with mantra chanting.
Some practitioners even recite 12 Surya Mantras, dedicating each round to a divine quality.
FAQs on Suryanamaskar
1. How many steps are there in Suryanamaskar?
There are 12 steps in one complete round, performed in a sequence.
2. How many rounds should I do daily?
Beginners can start with 2–3 rounds and gradually increase to 12 rounds.
3. Can Suryanamaskar help with weight loss?
Yes, regular practice burns calories, boosts metabolism, and tones muscles.
4. What is the best time to do Suryanamaskar?
Morning, on an empty stomach, is ideal. Evening practice is also possible if stomach is light.
5. Is it suitable for children?
Yes, but children should practice under supervision with fewer rounds.
6. Do I need to chant mantras while doing it?
Mantras are optional. They enhance spiritual experience but are not mandatory.
Conclusion
Suryanamaskar is more than just a set of yoga poses—it is a fusion of physical fitness, mindful breathing, and spiritual devotion. By practicing regularly, you can achieve better health, improved concentration, and a deeper sense of inner peace.
Whether you’re a beginner or an advanced practitioner, this ancient practice offers timeless benefits. Start slow, respect your body’s limits, and let the Sun’s energy guide you to wellness.
Instagram:@thepinklotusacademia
Facebook: @thepinklotusacademia
Enquire Now: Click Here
Learn more: The Pink Lotus Academia
Youtube: The Pink Lotus Academia
Other Blogs: Click Here
Buy recommended Yoga Apparels: https://amzn.to/4dS9J4H